You know the hard part of residential construction for a weekend home is not the design, it is keeping permits, inspections, and deliveries moving when you are managing the job from the NYC area.
This Stroudsburg, Pennsylvania summer house is a good example of what a focused scope and a tight sequence can do.
I am Alex Fedin, a licensed General Contractor and founder of HomeRenovation4U in New York City, and I built this page to show you how we planned and executed a four-month build without sacrificing quality.
Below, I will walk you through the scope, framing, electrical and plumbing, HVAC selection, finishes, and the management controls that kept the schedule steady.
What Was the Scope of This Residential Construction Project in Stroudsburg, PA?

The homeowner wanted a low-maintenance summer house in Stroudsburg, PA, built in about four months, with open living space, lots of natural light, and durable finishes that hold up to seasonal use.
We translated that into a phased plan that respected site limits, local approvals, energy targets, and a finish schedule that left time for punch-list work.
For anyone planning a second home build from the NYC metro area, this is the key takeaway: you win the schedule in the planning phase, long before the first stud goes up.
- Site and approvals: surveys, setbacks, drainage approach, and permit path.
- Structure: foundation, exterior shell, and framing sized for large openings.
- Systems: coordinated electrical, plumbing, and HVAC routes before closing walls.
- Envelope: air sealing, insulation strategy, and window detailing.
- Interior finishes: drywall finish level, paint strategy, flooring, and tile waterproofing.
- Closeout: inspections, documentation, and a practical homeowner walkthrough.
Pennsylvania’s Department of Labor and Industry publishes the Uniform Construction Code updates, and the Department of Environmental Protection spells out when earth disturbance triggers stormwater permitting, so we verify both early to avoid mid-project surprises.
Watch the Stroudsburg summer house project video
What goals did the homeowner set for this summer house and how were they translated into a 4-month construction plan?
The homeowner’s goals were clear: low maintenance, open sightlines, large windows, and efficient systems that keep operating costs predictable.
We translated those goals into a plan with month-by-month milestones, early inspection targets, and a short list of finish selections locked in before rough-ins began.
To put the four-month target in context, many custom homes take far longer, so the only way to make this realistic is to keep the scope tight and reduce change orders.
| Month | What we targeted | What you should lock in early |
|---|---|---|
| Month 1 | Permits, site prep, foundation start | Window sizes, structural openings, main fixture locations |
| Month 2 | Framing, sheathing, dry-in | Exterior door swings, flashing approach, insulation package |
| Month 3 | Mechanical rough-ins, inspections, insulation | Electrical layout, plumbing fixture list, HVAC equipment selection |
| Month 4 | Drywall, paint, flooring, tile, trim, closeout | Paint sheen, grout choice, final hardware, punch-list priorities |
I kept a living punch list from day one. That way, small defects did not stack up into a stressful final week.
What site conditions and local PA building requirements were considered before construction began?
Before we priced the build, we verified the basics that often derail second-home projects: soil and drainage behavior, slope, access for deliveries, and where water wanted to go during heavy rain.
Then we confirmed the approval path with the local municipality, since most UCC enforcement in Pennsylvania is handled locally, often through municipal offices or certified third-party inspection agencies.
- Drainage and foundation planning: we planned grading, downspout discharge, and water control before we chose finish materials.
- Setbacks and easements: we verified buildable area so decks, steps, and mechanical penetrations stayed compliant.
- Egress and life-safety: window egress sizing, stair geometry, and smoke and CO detector layout were set early.
- Stormwater triggers: if the site disturbance approaches an acre, the permitting and inspection burden can change fast, so we confirm this before mobilization.
Clear plans and early inspections are what keep a tight schedule from slipping.
My architecture background helps here, because I am always looking for coordination issues before they become field changes.
How was the overall workflow organized from framing to final finishes?
We built the workflow around two realities: inspections can stop work cold, and long-lead items can wreck a finish schedule.
In the Commerce Department’s February 18, 2026 release, U.S. building permits for December 2025 ran at a 1,448,000 seasonally adjusted annual rate, up 4.3% from November, which is a good reminder that supplier and inspector calendars can get crowded with very little warning.
- Front-load approvals: we requested footing, foundation, and framing inspections as soon as work was ready, not the day we wanted to pour.
- Order long-lead items early: windows, exterior doors, and any specialty beams were confirmed before framing started.
- Protect the job financially: we reviewed residential construction insurance options early, including builder’s risk for the structure and general liability coverage for jobsite claims.
- Run a tight rough-in window: plumbing, electrical, and HVAC followed a set sequence so nobody fought for the same stud bay.
- Finish with control points: moisture checks, surface flatness checks, and a rolling punch list reduced rework at the end.
Next, I will outline how exterior and interior framing supported large windows and open living space without creating future maintenance issues.
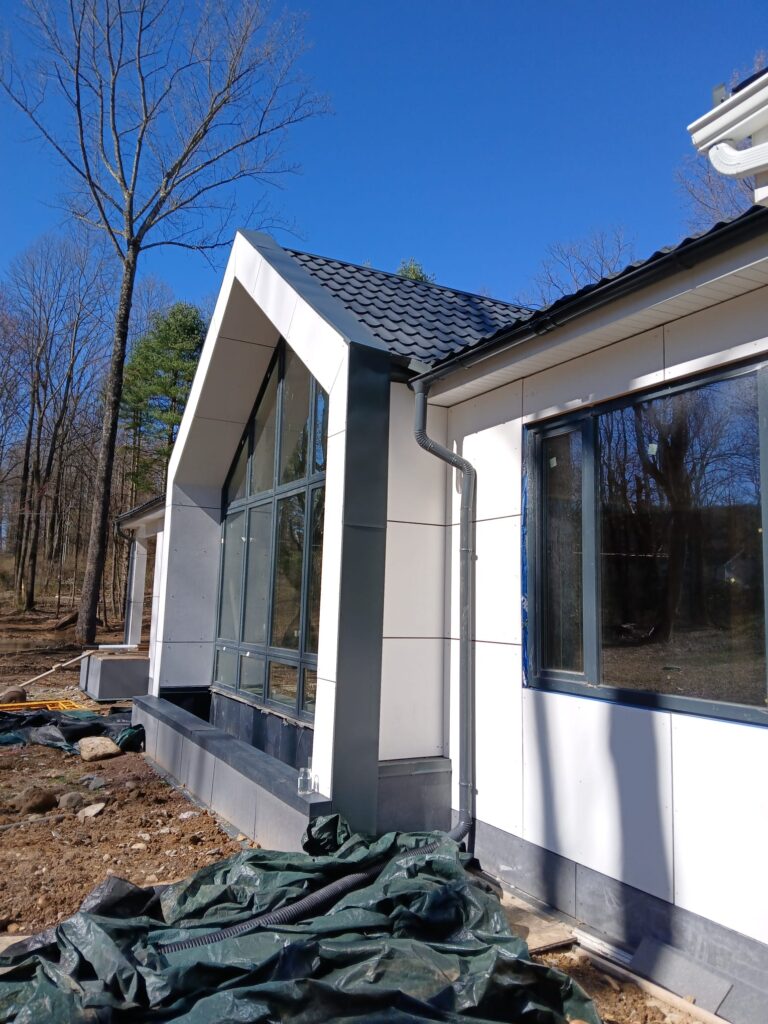
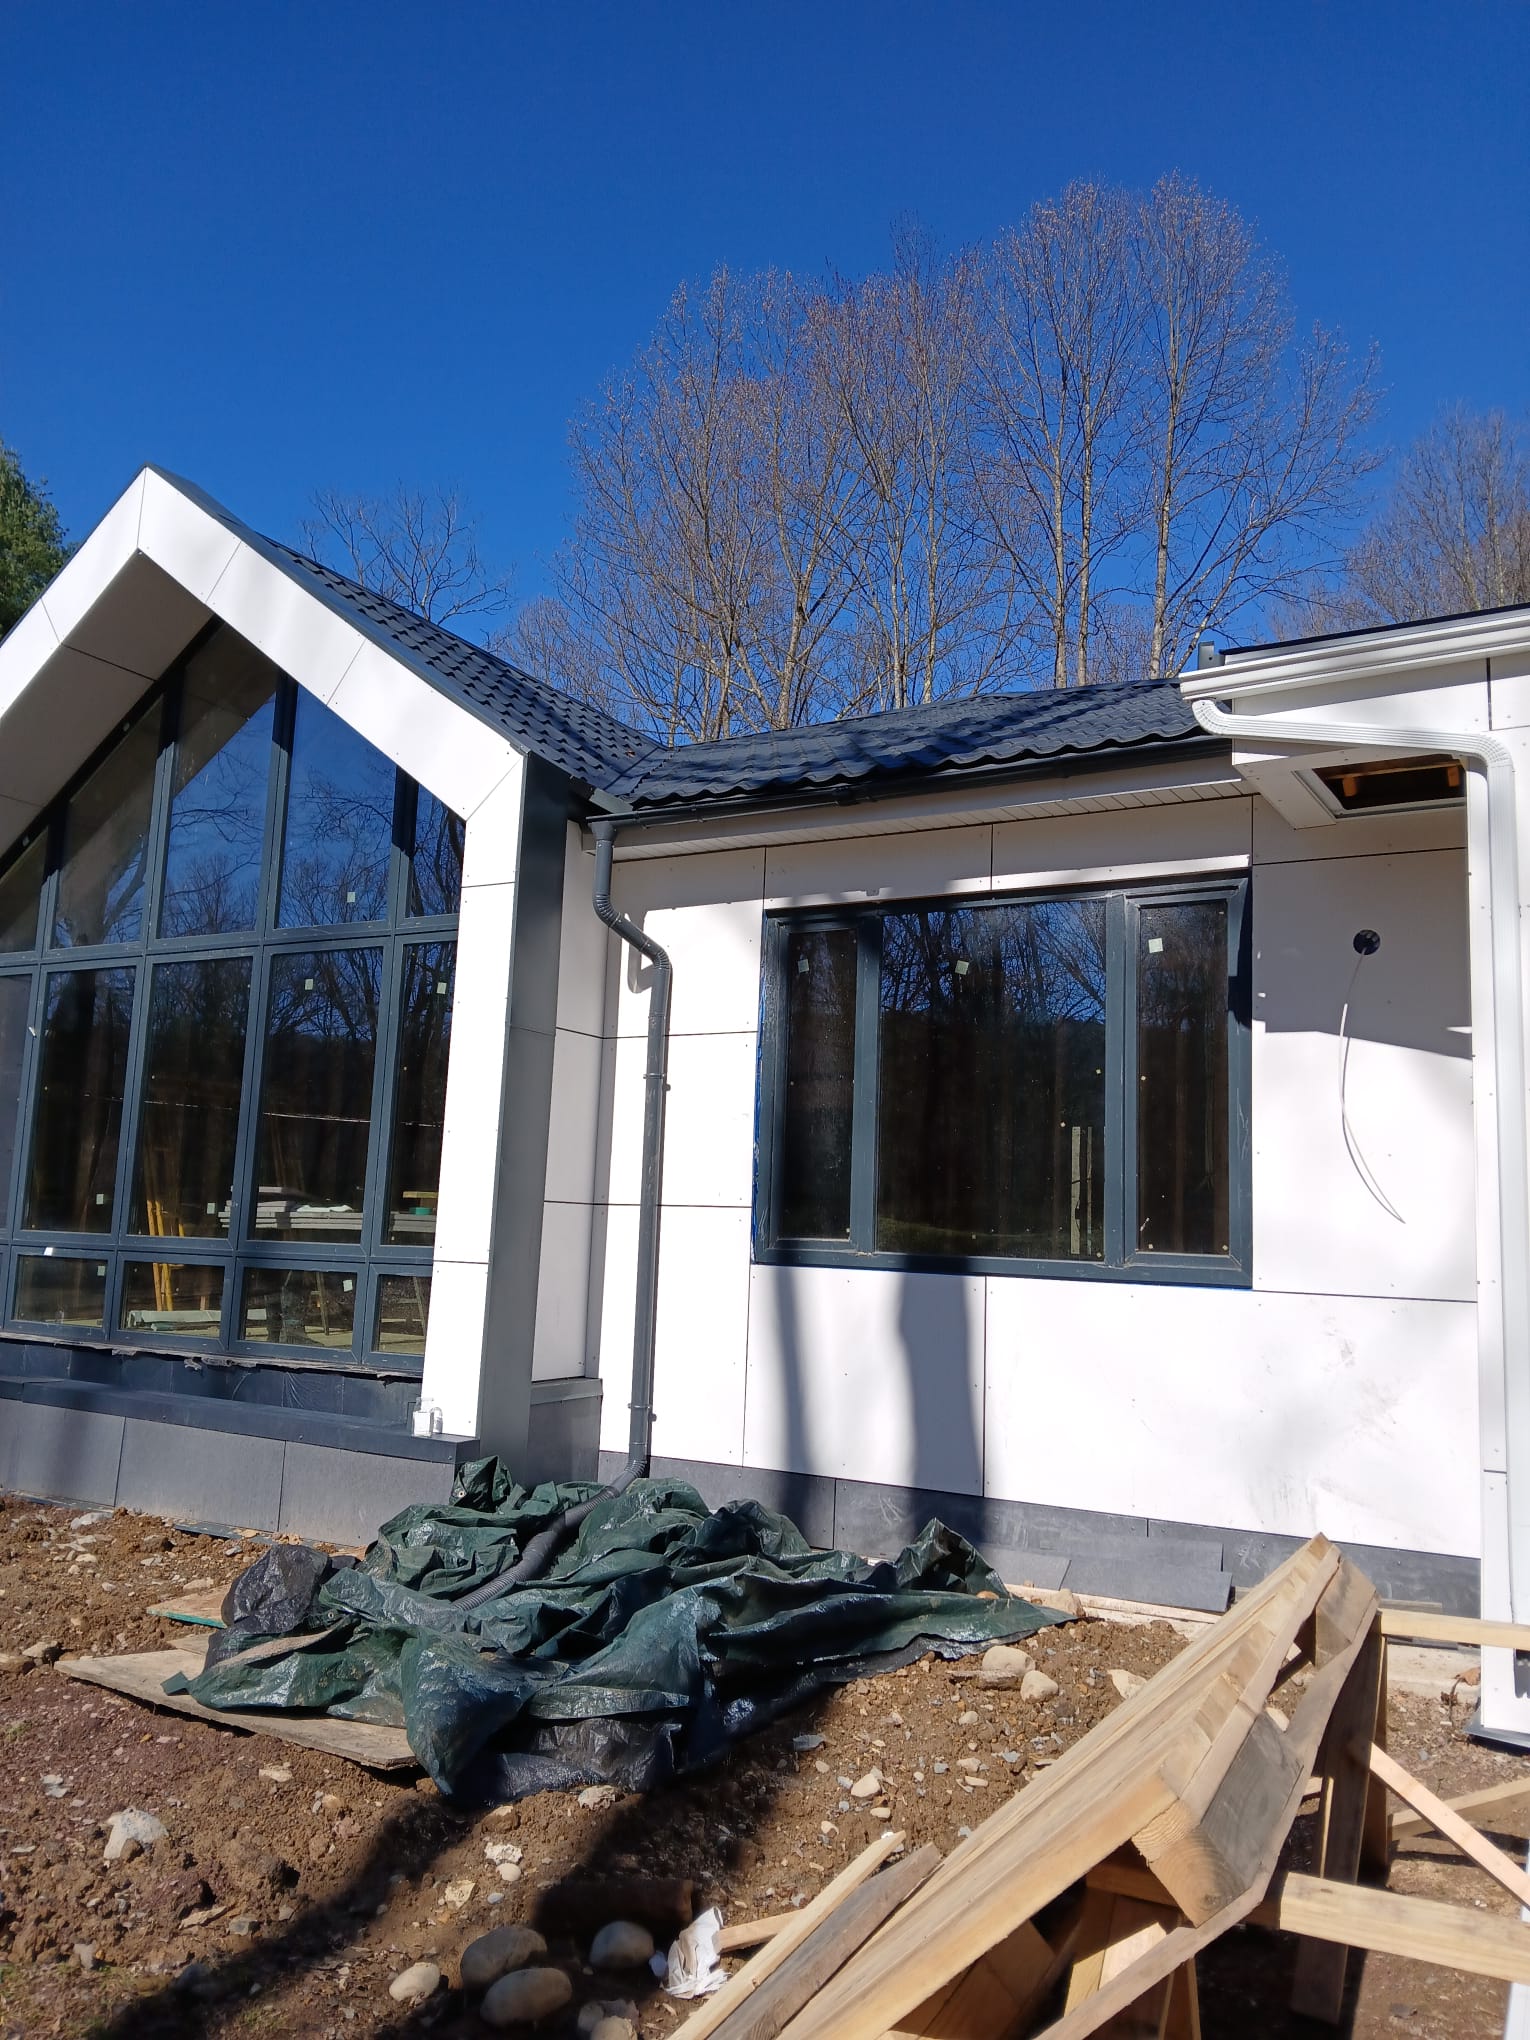
How Was Exterior and Interior Framing Completed for Structural Stability?
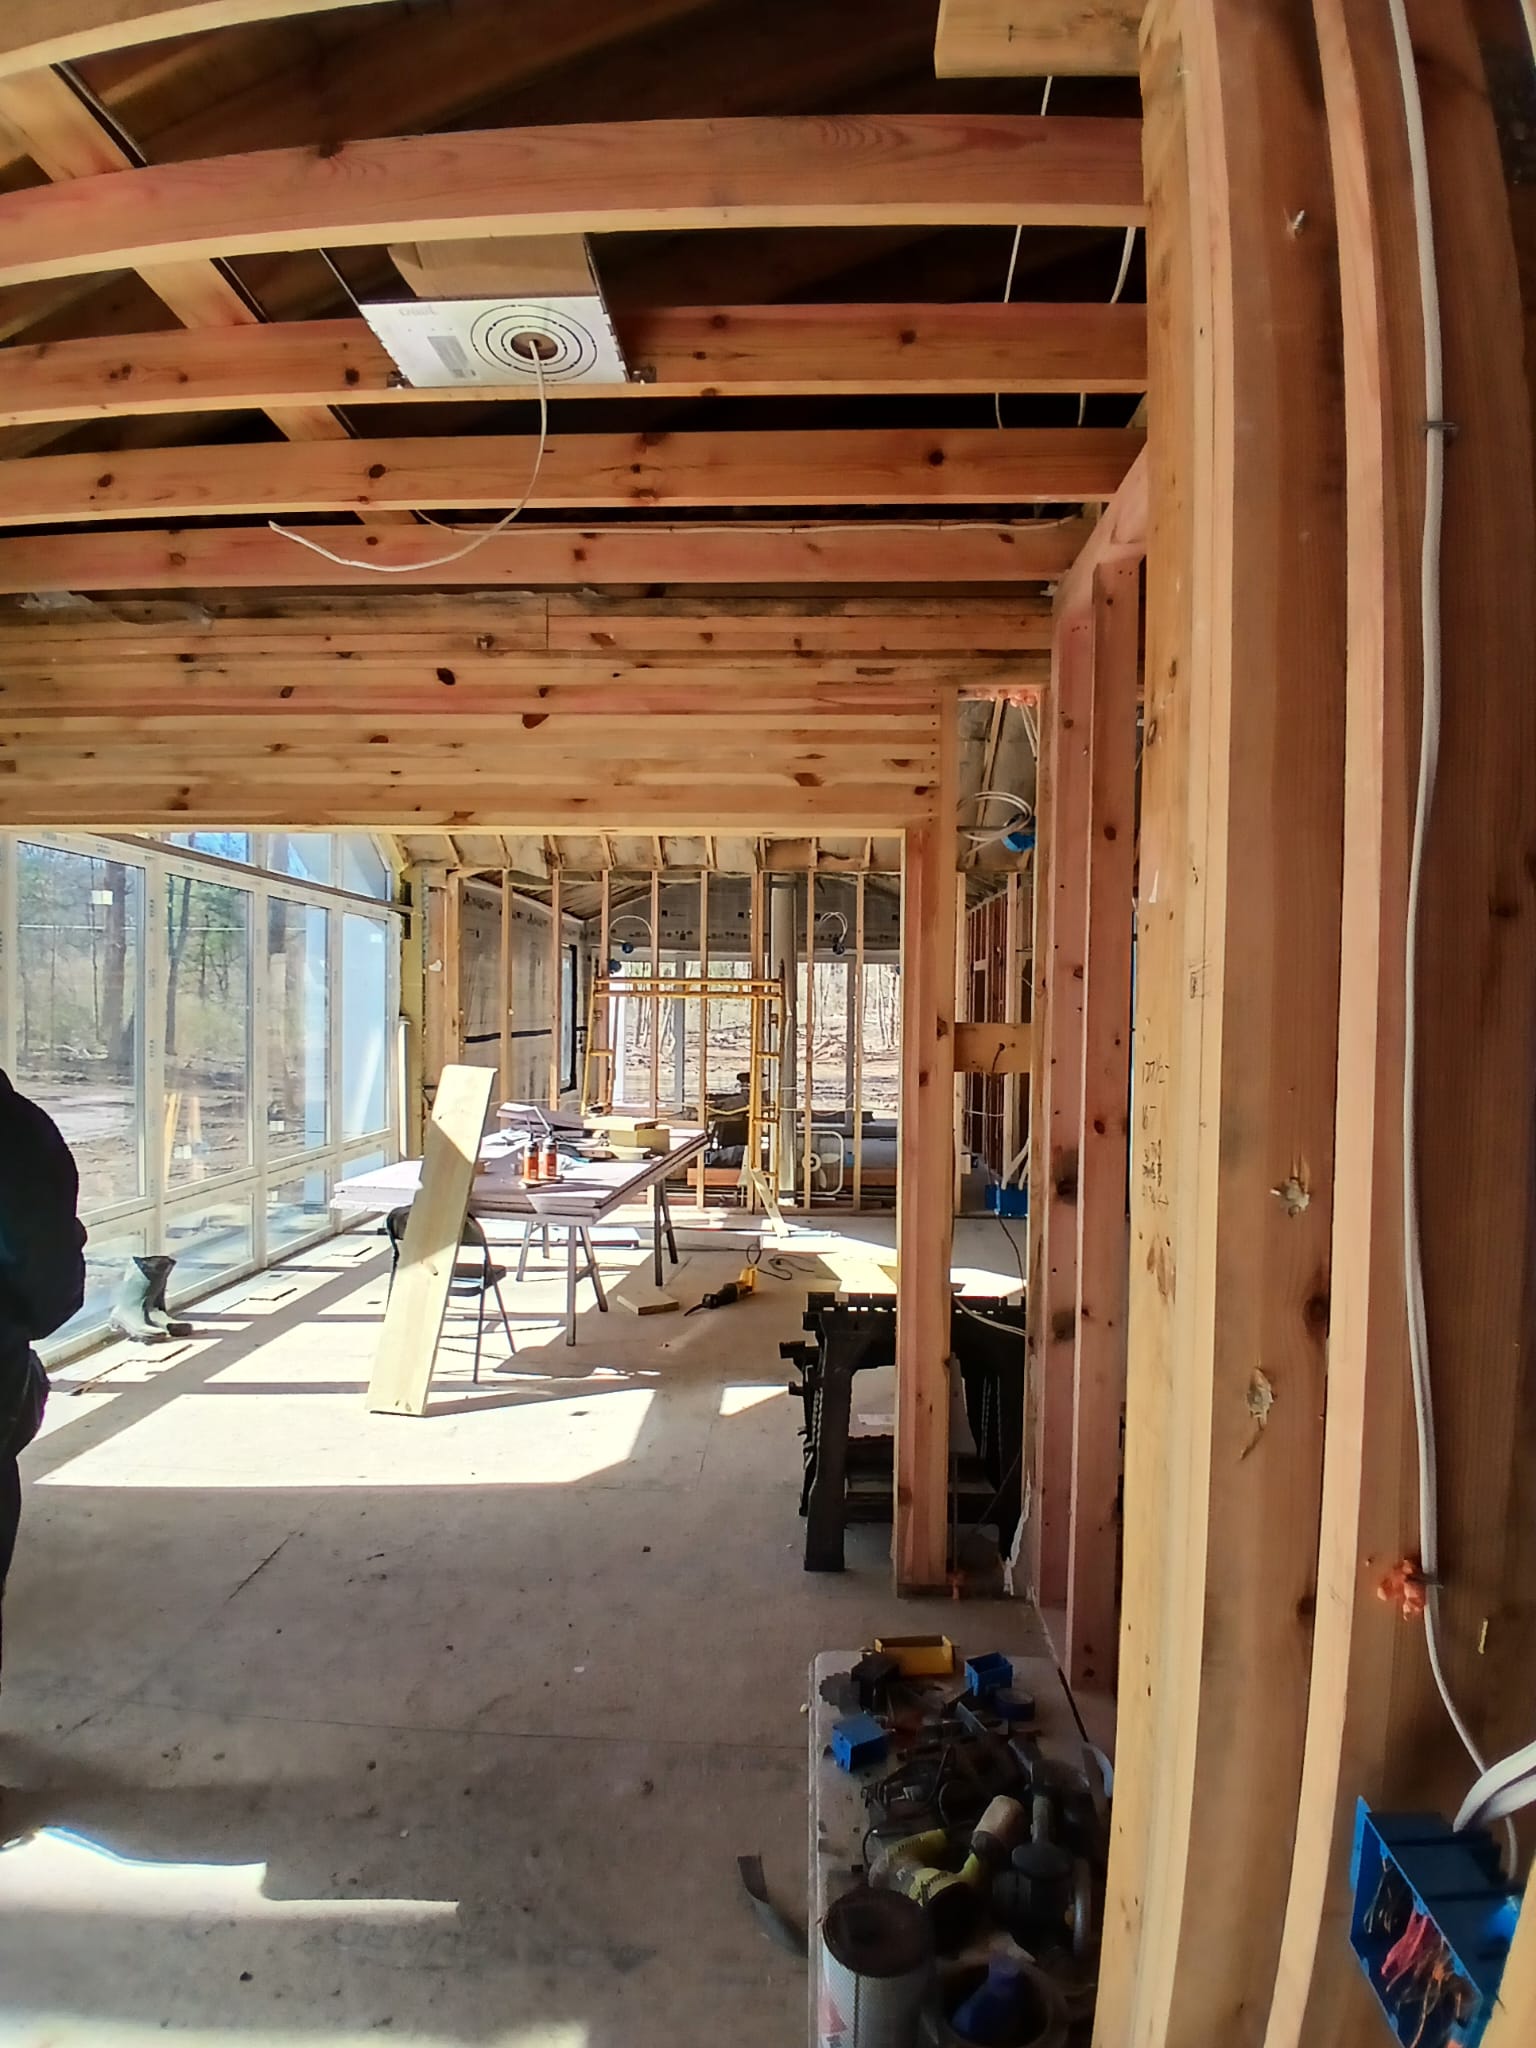
Exterior and interior framing used engineered members where the design demanded wide openings, and we kept framing layouts consistent so mechanical routes stayed predictable.
For seasonal homes in northeastern Pennsylvania, I also treat the envelope as part of the structure, because air leaks and wet framing lead to movement, cracking, and callbacks.
How was exterior framing designed to handle Pennsylvania weather and ensure energy efficiency?
We framed with 2×6 exterior walls to create room for higher insulation values and cleaner mechanical runs, then we focused on air sealing at the sheathing and openings.
Under Pennsylvania’s 2021 IECC adoption effective January 1, 2026 (as listed by the U.S. Department of Energy’s building energy codes program), the insulation and air leakage expectations tighten, so we plan the wall assembly with code compliance in mind from the start.
| Wall approach | Why it works in practice | Common pitfall to avoid |
|---|---|---|
| 2×6 cavity insulation plus exterior continuous insulation | Improves comfort by reducing thermal bridging through studs | Skipping window flashing continuity at foam transitions |
| High-quality taped sheathing air barrier | Reduces drafts and helps HVAC sizing stay accurate | Rushed tape work at corners and penetrations |
| Careful rough opening prep and flashing | Protects large window openings from bulk water intrusion | Installing windows before the sill pan and water management is complete |
On jobs like this, a taped sheathing system can be a practical way to tighten the envelope. For example, Huber’s ZIP System flashing tapes are pressure-activated, and that detail matters because crews need to roll tape correctly for it to perform as intended.
What structural solutions were used for large windows and open interior spaces?
Large window openings and open living areas need engineered load paths, not guesswork.
We used LVL headers and beams where wood made sense, and we used steel where the span, deflection limits, or architectural layout required it.
- LVL headers: products like Microllam LVL are commonly used for window and garage door headers because they are uniform and dimensionally stable.
- Glulam beams: APA notes glulam is a stress-rated engineered beam, often specified for long, open spans in residential construction where you want strength with clean lines.
- Window detailing: we kept the opening square, built solid backing for flashing, and treated water management as part of the structural plan.
- Comfort at glass: thermally improved window frames and careful air sealing help reduce condensation risk near large glazed areas.
Large openings need strong beams and tight details to stay safe and dry.
A pro-tip I share with NYC-area homeowners buying in the Poconos: if your plan includes “wall-to-wall glass,” budget for engineering and detailing, not just the window package.
How was framing coordinated with future mechanical systems to avoid conflicts?
We coordinated framing with HVAC, plumbing, and electrical before we started, because cutting structural members later is one of the fastest ways to burn time and money.
- Route planning before framing: we mapped duct trunks, plumbing stacks, and electrical home runs so we could frame chases intentionally.
- Dedicated chases: we built clear pathways for ducts and pipes, which kept rough-ins clean and inspection-friendly.
- Header and beam awareness: we avoided placing major mechanical routes where engineered members would block them.
- Air sealing access: we planned for sealant and flashing access at penetrations before walls were crowded with lines.
- Daily trade coordination: quick check-ins prevented “I thought you were going there” conflicts between subs.
- Future serviceability: shutoffs, cleanouts, and access panels were planned so seasonal maintenance stays simple.
How Were Electrical and Plumbing Systems Installed to Meet Modern Standards?
For a seasonal home, I plan electrical and plumbing with two goals: safety today and easy troubleshooting later.
That means clear circuit labeling, sensible outlet placement, winterization-friendly plumbing, and inspections scheduled around real readiness, not wishful thinking.
Watch the electrical and plumbing phase video
How was the electrical layout planned for lighting, outlets, and major equipment?
I planned the layout around how the homeowner would actually use the house on weekends, holidays, and rainy days indoors.
Then we tied that plan back to code basics like dedicated circuits, AFCI and GFCI protection, and the National Electrical Code spacing rules for receptacles.
- Outlet spacing: we followed the NEC “6-foot rule,” which leads to the common 6-foot and 12-foot spacing pattern along wall lines to reduce extension-cord use.
- Kitchen power: we planned dedicated 20-amp small-appliance circuits for countertop loads and separated heavy draws like microwave and dishwasher where needed.
- Wet-zone protection: we placed GFCI protection anywhere water is part of normal use, then verified locations before trim-out.
- Layered lighting: we separated ambient, task, and accent lighting so the homeowner could keep the house bright without running every fixture.
- Panel planning: we sized the panel for current loads and likely upgrades, then labeled every circuit for fast service calls.
- Conflict avoidance: we coordinated wire routes with framing and HVAC so we did not fight for the same cavities.
What plumbing systems were installed for water supply and drainage in a seasonal home?
The plumbing plan prioritized freeze protection and easy shutdown, since a seasonal home can sit unused during the coldest weeks.
- PEX supply: PEX tolerates freezing conditions better than rigid pipe and makes long runs cleaner with fewer fittings.
- Shutoffs you can reach: we placed isolation valves where a homeowner can actually access them without moving storage or opening finished ceilings.
- Frost‑proof exterior fixtures: exterior hose bibs and penetrations were detailed to reduce winter risk.
- Drainage and cleanouts: we kept cleanouts accessible, because seasonal homes need maintenance that can be done fast during a short visit.
- Condensate planning: we coordinated HVAC condensate routing with plumbing and electrical so nothing got hidden behind finished work.
Next, the discussion will cover inspections and the specific checkpoints we use to keep the job moving.
How were inspections handled to meet residential construction codes in PA?
Inspections are not a formality in Pennsylvania, they are a schedule driver.
Many UCC inspection programs spell out required checkpoints like footing, foundation, framing, and final, and they often require at least a day of notice before an inspector can show up.
- Footing and foundation inspections: scheduled before concrete placement and before backfill.
- Framing inspection: completed after structural framing and bracing were ready for review.
- Rough electrical and rough plumbing: done before insulation and drywall, with corrections handled immediately.
- Mechanical rough-in: verified for equipment location, duct routing, and service clearances.
- Final inspection and closeout: completed with documentation ready, supporting a clean handoff to the homeowner.
What HVAC System Was Selected and How Was It Integrated?
We chose a high-efficiency heat pump, sized it to the real load, and routed ducts through framed chases to protect both performance and interior design.
The biggest mistake I see in seasonal homes is oversizing, because short cycling can hurt comfort and humidity control.
How was the HVAC system sized for efficient heating and cooling of the summer house?
The contractor ran a Manual J load calculation tool, using room sizes, window areas, insulation values, and expected occupancy.
ACCA describes Manual J as an ANSI-recognized standard for residential load calculations, and it is a smart way to avoid buying equipment based on rough rules of thumb.
We then matched capacity to the calculated loads and planned zoning where it made sense for seasonal use, so bedrooms could stay comfortable without over-conditioning the whole house.
How were ducts and vents routed within the framing without affecting interior design?
Duct runs stayed out of sight and out of the way, so the finished house looked clean and the HVAC system stayed serviceable.
- Kept main trunks inside planned chases near joists, so ceilings stayed consistent.
- Used short, direct branch runs to reduce noise and pressure loss.
- Placed registers with furniture layout in mind, so airflow did not blow directly onto seating.
- Coordinated with electrical early, keeping ducts clear of major wire routes and recessed lighting zones.
- Specified insulated ductwork where routing crossed unconditioned zones.
- Scheduled balancing before final closeout, so each room delivered the intended airflow.
What energy-efficient features were included to reduce long-term costs?
We treated efficiency as a system, not a single product choice.
That meant a tight envelope, right-sized equipment, smart controls, and details that protect real-world performance after the crews leave.
- Right-sizing with Manual J: reduces short cycling and helps humidity control in summer.
- Cold-climate capability: ENERGY STAR lists cold-climate heat pump criteria that include minimum HSPF2 thresholds and low-temperature performance tests, which matters in a Pennsylvania winter.
- Air sealing and insulation continuity: reduces drafts and can let you use smaller equipment without comfort complaints.
- Programmable controls and zoning: helps a seasonal home avoid conditioning empty rooms.
- Duct sealing and verification: duct leakage testing is much easier to pass before drywall, because you can still reach every joint.
If you are planning upgrades for a primary residence, keep incentives in mind. The IRS states that the Energy Efficient Home Improvement Credit applies to qualifying improvements placed in service through December 31, 2025, so in 2026 you should plan the budget as if that federal credit is no longer available.
How Were Drywall, Taping, and Painting Finished to a High Standard?
Drywall is where a home starts to look finished, and it is also where small shortcuts show up for years.
We focused on flatness, clean corners, and paint choices that hold up to seasonal temperature swings.
Painters used low-VOC paints and a consistent priming approach, which is a practical step for comfort in a tighter home.
What preparation was completed before drywall installation?
We did not hang drywall until the walls were truly ready, because drywall hides problems, it does not solve them.
- Verified framing was plumb and square, and corrected problem corners before they became finish issues.
- Confirmed rough electrical and plumbing were complete, tested, and signed off for the next phase.
- Completed insulation and air sealing at windows, doors, rim joists, and penetrations.
- Added blocking for cabinets, rails, and wall-mounted fixtures so fasteners hit solid backing.
- Protected floors and staged materials so drywall crews could work fast without damaging finished items.
How were joints taped and finished to create smooth surfaces?
We used a method that is simple but disciplined: tape embedded cleanly, coats applied in the right thickness, and sanding done with lighting that exposes defects.
If you have large windows or strong side lighting, a higher drywall finish level can be worth it.
- Finish level choice: major gypsum manufacturers describe Level 4 as a common standard for flat paints and light textures, while Level 5 adds a full skim coat for more critical lighting and higher-sheen paints.
- Three-coat approach: we built out joints with progressively wider coats, then checked flatness under angled light.
- Corner durability: we reinforced corners to reduce future cracking from seasonal movement.
- Prime before paint: primer sealed the surface and reduced flashing at joints.
What paints and techniques were used for durable interior finishes?
We used washable interior paint in living zones and moisture-resistant finishes in kitchens and baths, then we focused on prep work so the paint had a stable surface.
The U.S. Environmental Protection Agency notes that concentrations of many VOCs can be higher indoors than outdoors, so low-VOC paint plus good ventilation during curing is a practical step for comfort.
- Patched and sanded to remove ridges, then primed for consistent absorption.
- Applied two full topcoats with a consistent cut-in approach to avoid lap marks.
- Protected high-touch areas with the right sheen choice, so walls cleaned easily without burnishing.
- Scheduled touch-ups after trim and hardware, not before, so the final product stayed clean.
How Were Flooring and Tile Work Installed for Durability and Style?
Seasonal homes need finishes that handle humidity swings, wet boots, and frequent cleaning.
We selected resilient flooring and detailed wet areas like we expect them to get wet, because they will.
How were flooring materials selected for seasonal use and easy maintenance?
We matched flooring to how each space lives, not just how it looks in a sample board.
| Material | Best use in a seasonal home | Why homeowners like it |
|---|---|---|
| Luxury vinyl plank | Living areas and hallways | Easy cleanup, good scratch resistance, stable under humidity swings |
| Porcelain tile | Bathrooms, entries, laundry zones | Water resistance and long wear |
| Engineered hardwood | Low-moisture rooms | Warm feel underfoot with more stability than solid wood |
We also documented care and cleaning guidance for the homeowner, because the right maintenance routine prevents most “floor problems” that are really lifestyle problems.
What subfloor preparation ensured long-lasting installation?
Subfloor prep is where durable floors are made.
If you skip it, even premium materials can fail early.
- Moisture verification: tested substrate moisture before adhesives and underlayment went down.
- Flatness targets: for many tile installations, ANSI A108 tolerances commonly referenced in specifications call for floors within 1/4 inch in 10 feet, and large format tile often needs tighter flatness.
- Fastening and stiffness: used proper fastening patterns and corrected movement that can cause squeaks and cracked grout.
- Transitions and expansion: planned expansion gaps and transitions so seasonal movement did not create buckling.
- Wet-area build-up: installed the right backer and waterproofing layers before tile, not after problems showed up.
Next, the blog will explain how tile work in wet areas was detailed to prevent moisture issues.
How was tile work completed in wet areas to prevent moisture issues?
Wet areas only stay dry when you treat waterproofing as a system: substrate, membrane, drain detailing, and movement joints all working together.
For slope, the National Tile Contractors Association has published guidance that calls for a minimum 1/4 inch per foot slope on horizontal wet-area surfaces so water drains instead of pooling.
- Waterproofed wet-area substrates before tile, then inspected coverage at corners and penetrations.
- Confirmed shower floors and horizontal surfaces pitched to drain, then verified with a level before setting tile.
- Used movement-friendly sealant at changes of plane, because grout is not a movement joint.
- Chose grout based on use: epoxy grout can be a strong option in wet zones because it is non-porous and does not require sealing, which reduces maintenance.
- Finished edges and transitions with durable trim and clean caulk lines for easier cleaning.
How Was the Project Managed to Meet the 4-Month Timeline?
A four-month build lives or dies on scheduling discipline.
We managed subcontractors, inspections, and quality checks like a tight production plan, while still leaving room for weather and delivery reality in Pennsylvania.
How were subcontractors scheduled to maintain steady progress?
We set firm start and end dates, then protected the critical path with clear handoffs.
- Built a master schedule with short trade windows, so rough-ins did not drift.
- Used a two-week lookahead plan, updated during on-site check-ins.
- Added buffer days around inspections and long-lead deliveries.
- Confirmed material readiness before crews arrived, so labor time stayed productive.
- Controlled change orders, because late changes are schedule killers in short builds.
Up next, I will show you the quality control checks we used to prevent rework.
What quality control checks were performed at each phase?
I inspected work at every major milestone and logged corrections early, while access was still easy.
- Framing: verified spacing, connections, and opening sizes before sheathing and windows.
- Dry-in: checked flashing and water management details before cladding covered them.
- Rough-ins: confirmed clearances, tested systems, and verified locations against the plan.
- Insulation and air sealing: checked continuity at common leak points before drywall.
- Finishes: verified flatness, moisture readiness, and alignment for flooring, tile, and trim.
- Closeout: walked the home with a punch list that tied each item to a responsible trade and date.
How were final inspections and the homeowner walkthrough completed before handover?
Final inspections went smoother because we treated documentation as part of the job, not an afterthought.
We also ran the homeowner walkthrough like a training session, because a seasonal home needs a simple routine for shutoffs, filters, and winter prep.
- Requested final inspections only after corrections were complete and access was clear.
- Compiled warranties, manuals, and circuit and shutoff maps into a handover packet.
- Demonstrated HVAC operation, thermostat settings, and filter locations.
- Confirmed plumbing shutoffs and seasonal drain-down steps with the homeowner.
- Completed a signed punch list, then scheduled the last touch-ups before the owner’s first full season of use.
Conclusion: What NYC Metro Homeowners Should Take From This Stroudsburg Build
If you are planning residential construction in Pennsylvania from the NYC area, treat planning as the first phase of building, not paperwork.
Lock your scope, confirm code and permit expectations, order long-lead items early, and demand real coordination between framing and mechanical trades.
That is how you protect both the timeline and the craftsmanship in a seasonal home.
FAQs
1. What is summer house residential construction in Pennsylvania?
Summer house residential construction in Pennsylvania means residential construction for seasonal or year-round homes, it covers site work, plans, permits, and local code checks.
2. How do I find residential construction contractors near me for a summer house?
Search online for “residential construction contractors near me” or “residential construction companies near me”, check licenses, read reviews, and ask for past project photos.
3. What do residential construction companies do on a summer house project?
Residential construction companies manage budgets, hire trades, order materials, and schedule inspections, they follow building codes and safety rules.
4. Do I need residential construction insurance, and what residential construction services are common?
Yes, residential construction insurance protects the owner and builders from damage and liability, it often covers site risks and worker incidents. Common residential construction services include site prep, framing, roofing, finish work, and permit coordination.